
Today I finished my showreel for Animation 101. My showreel included all of the animations I had created for the module and put them all into one big video. I was asked to put titles in front of all the animations and to loop them 3 times so that the audience understood completely and effectively what was going on. I successfully added the titles in front of every animation which I added to the video and also made a outtakes section at the end which included the animations I created that weren’t in the required tasks to do. There was only one problem which I ran into while creating my showreel, the problem occurred of the exported file being over 1GB in size which fills up my storage very fast.
Category: Animation 101
Learning Expressive Animations With The Techniques Of The Ball Bounce
Today I also learnt in class how to create and develop expressive and realistic looking animations by basing what I am creating of the real life versions. I learnt how to base the object such as a basketball bouncing on timings. By calculating how high, the weight and size of the ball and the force it is thrown at I can time how long it takes to bounce. By doing this I can also calculate the easing in and out of the ball as it speeds up and slows down. I can use this to apply to lots of different things such as other balls or human movement etc.. I also learnt about using the aspects of having the animation as a cartoon or more realistic. By having the animation as a cartoon I would have to express each action a lot more by having it squash and stretch for example. If I wanted to create it in a realistic fashion I would just use the methods above to observe how it would look then transfer and program it into a successful animation. I have already created 4 ball bounce animations off the top of my head and not really using the timing calculation effectively, so I am going to create some again and use the timings and weight extremely well so the animation will look just how it would in real life if the specific balls I use get bounced.
I also created a simple ball bouncing animation using hedge aspects to go along with it.
Beachball Bouncing In Maya
Today I finished of my 4th ball bounce practice. I created an animation of a beach-ball bouncing. I took into context the weight size and speed of the ball and used that to create an effective and realistic looking ball bounce animation. I knew that a beach-ball was filled with air so I had to create the animation so it looked like it sort of floated down when it hit the ground. I set the relevant key frames and previewed my animation multiple times until I successfully gave the illusion that it was a beach-ball bouncing.
Tennisball And Bowlingball Bouncing In Maya
Today I continued with the ball bouncing tasks and created a tennis-ball bouncing. I knew that the ball was small soft and light so I applied that onto the animation to create an effective tennis-ball bouncing animation. I knew that a tennis-ball bounced quite a bit so I watched a video along with my own knowledge of the ball bouncing so I could get the correct timings and bounces in correlation to the frames.
I also created an animation of a bowling ball bouncing, I also did research on this and I knew that a bowling ball was large, heavy and hard so I knew it wouldn’t bounce too much and fall quite quickly. I knew that a bouncing ball would have a lot of energy that they release into the ground when they hit it so i knew that it wouldn’t bounce too much alongside with the size, texture and weight of it.
Basketball Bouncing In Maya
Today I learnt about using cameras in maya and also how different balls are supposed to bounce. I created my own version of a basketball bouncing and I included a different camera angle which allowed the animation to look different from normal. I had the ball get squashed a tiny bit when bouncing and also roll when it had finished bouncing. I used a bouncing ball background to mirror the frames used to create an effective bounce animation.
Stop Motion Cube Stories
Today I created a stop motion animation story only using cubes. The story which I made consisted of 2 cubes, 1 of which a human and 1 a dog. I had these cubes run around and play happily together for a short while. I used blue tac and clay to make the cubes stand up for a more effective animation.
I had a first attempt at making this animation but I used props in order to do it. This wasn’t part of the task because you weren’t allowed to use props so I only created the beginning part of it because I didn’t realise it until after.
Ultimate Pendulum And Spider Tangents
Today I learnt about the ultimate pendulum and the spider tangents. Using what I learnt I had to create my own versions of these two animation methods on maya.
Firstly the ultimate pendulum consisted of an object moving across the screen with a pendulum attached. I had to create the movements that he pendulum would make as the object moved.
Secondly the spider tangent consisted of me creating an animation to show a spider spinning in circles on a web, I had to set rotation point on the animation in order to do this.
Moving A Sphere In A Pendulum Motion
Today I learnt about using pendulums in animation to create effective moving around an ark. I created 4 separate Maya animations for this. The first 2 which I created were made using my own method but didn’t look too smooth and finished. The first one just continued to swing but I created the other one to slow down efficiently to a stop to show what it would look like when losing energy. I didn’t use the rotation tool for these first 2 that is why they looked like they did.
I then created another 2 and used the rotation tool when setting key frames by doing this it created a much smoother and more accurate animation which managed to portray my pendulum movement well. This first one just continued to swing but I created the other one to slow down efficiently to a stop to show what it would look like when losing energy.
I also used stop motion effectively to create this pendulum method. I did the same as I did before by having one video with it constantly swinging and the other with the pendulum slowing down and stopping.
Bar Sheets And Storyboards
Today I learnt about using bar sheets and storyboards to plan out my animations on paper. Both of these methods are extremely effective because they allow me to plan exactly what I am going to do for my animation. I created a bar sheet for my stop motion animation about my cube moving with anticipation and followthrough. I planned it out to each frame so I knew exactly what to do when I came down to taking the shots for my stop motion animation. 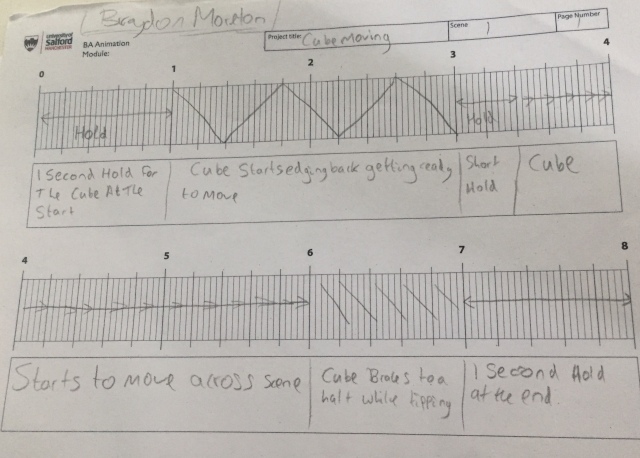
Creating First Stop-Motion Animations
Today I also created my stop motion animations I was assigned to do. I created 3 separate animations which were, a cube moving, a cube moving with speed ups and slow downs and a cube moving with anticipation and followthrough. By creating these 3 animations I was able to learn the basics of the program and the stop motion room and am able to use it effectively.

