Creating The Noise Pollution Animatic

Today I started production on the noise pollution animatic for my group project. I had been given all the resources needed to create a basic animatic to get an idea on what to create for our final piece. I started off by designating a folder for everything which was to be involved in this animatic. Once everything was collected I recorded myself saying out the script in order to get an idea of how long each scene will take and when to have the objects moving when. With all of these I was ready to start production on my animatic.

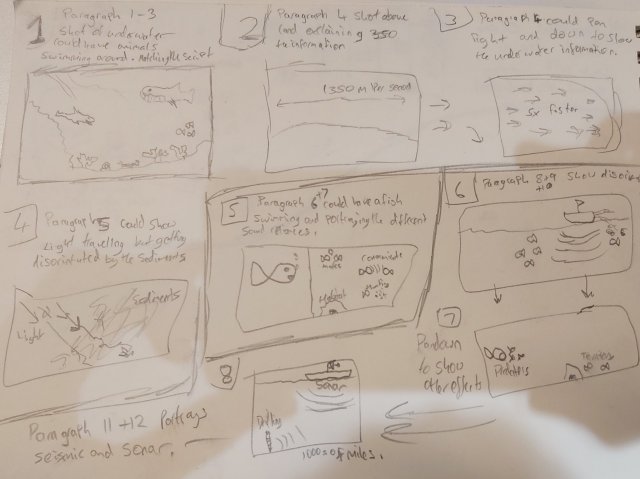
The first section was the overview, for this part I decided to have the underwater background and have a whale and some smaller fish swim across while I was narrating. I then zoomed into the coral to talk about effects on smaller marine creatures to finish off the first part by filling the screen with water. Following this I used the sky background and started it off under the water to then bring it up and explain the distances which sound travels in different volumes such as underwater and on land. I also visually showed sunlight getting distorted when traveling underwater. With these 2 scenes it concluded the overview.

The next section involved the needs of sound for marine wildlife, the first part of this section didnt involve much because I couldnt think of what to put there at the time but on the second half it involved visuals explaining finding habitats, mates, navigation and communication. I exported the this section of my animatic and that was the needs part finished.

The following section was the effects, this had to have a lot of visuals it it to show the effects that this pollution had on marine wildlife. I included a boat which disorientated fishes for the first part which fitted with the script. Along with this the second part I reused from the needs section but I changed it up to show that all the fish were getting confused once the noise pollution hit them. I showed them leaving their mates and habitats and swimming the wrong way towards the noise. The third part included me to show seismic and sonar energy which effected marine animals ability to hear. I showed two fish communicating until it gets disrupted with sonar activity which leads the fish getting confused. Following this I had a paragraph come up on screen explaining the next section because I was unsure on how to visually explain it other than that. This concluded the effects section of the animatic.

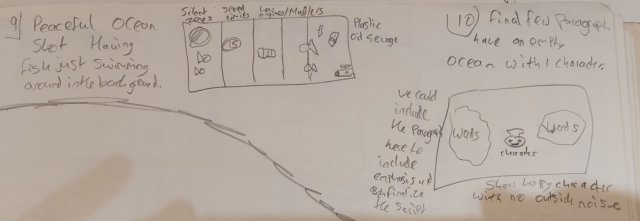
The final section was the help section, this included a sort of bullet list for the first part simplifying what it said in the script and getting straight too the point visually for the audience. I included visuals for the last three headings which were plastic, sewage and oil. The next stage included a much more peaceful scene with two fish swimming in position with a blank screen. I didnt know what else to put in this scene so at the end of the script I just involved a few powerful words at the end which emphasised the last seconds of the animation.

I then went on to bring everything into premiere and work it together such as the sound and after effect exports to create the animatic. I also added other sounds into the animatic to improve the overall feel of it and allow it to be more professional in the end run.

Overall I found this all to be quite a bit tricky I had never used after effects mainly before so it was all a bit still new to me. I feel as though I have got the hand of it through doing this and I can create better animations from it. I am open to changing or adding things into the animatic if my group wants to see more visuals or needs a better idea into what is going into the animation, but so far I have included everything that I could and that I think makes a successful animatic for our Animated Documentary.

The Animatic can be found here!

Learning Adobe InDesign And Its Use For The Production Bible

Today in my lecture I was told about the importance of Adobe InDesign when creating a production bible. I had used Adobe InDesign in a previous module for a production bible so I already knew the basics and how to work my way around the program. I was told useful information about how to set up the document in order to create an efficient production bible. I was firstly told how I should work with 4 pages at a time because doing this would enable me to keep a double paged spread and not have an unbalanced document. I was also told about safety guidelines again and how to enable the safe zones in order to show where point of the page could get cut off during printing or viewing from another monitor.

Another thing I was told about was how to create a strong and powerful production bible with design tactics and dedicated pages to different stages of production done and to the individual members of my team, doing this would allow work to be portfolio worthy and it increases the production quality of what we have created. I learnt about master page templates and also how to individualize a page and only have specific features on that specific page to create a change up on the production bible instead of having every page the same layout.


Updating And Finalizing My Script

Today I fully finalized my script for the noise pollution animated documentary. This final version had me including the specific information I had gathered from the meeting a few days ago and also cleaning up the overall script by removing unneeded information and having it flow into each part better. With this script finished it doesn’t match with the story that we have thought up. This would require us to brainstorm new ideas and think of a new more linear idea to portray the information provided better and more effectively. If the rest of the group aren’t happy with redoing the storyboard and having new ideas for the story I will have to adapt the script to match our ready chosen story idea and include information as relevant to that as I can. I will include a screen shot of the script underneath.

Along with this I have created my basic storyboard. I have included what I imagine will look the best when portraying my script information and some quick information to the basics which I am thinking should happen in the scene. It includes different slides which change according to what is being said and overall portraying the information perfectly. With this method instead of a basic story I believe that it gives the audience a true understanding of the topic and shows them well visually also. The basic initial ideas storyboard can be found underneath.

Insightful Coference Call

Today I took a conference call with a man named Michael Stocker about Noise Pollution on Marine Wildlife. Michael has been helping and giving out notice towards this issue since 1992. He shared a lot of useful information with me through screen sharing and explaining his stories and research with this type of pollution.

There were a few main causes of noise pollution which I didnt even hear about until this call. They included: shipping noise, seismic surveys, military sonar and digital sonar. All of these different types of noise pollution effect the wildlife within daily which then can disorientate nearby and far away animals.

I also got shown some useful websites and diagrams which Michael had, they showed just how bad each heading contributes to the noise pollution. The websites gave useful information an insight for any viewers towards the topic of noise pollution therefore broadening the realisation of it.

Overall this meeting was extremely helpful and has allowed me to understand a lot more about noise pollution in the ocean. I am very thankful to Michael for spending his time with me and explaining the issues from his research and experiences. After learning about all of this I am definitely going to adapt the script to involve a lot of this information which has been provided to me so generously.

Adobe Illustrator Introduction And Group Recap

Today I attended a lecture where I got introduced to the Adobe Illustrator program. This program has some similar features as Adobe After Effects such as the vector drawing tools. With the vector drawing this allows you to draw with lines which never lose resolution when zooming in or out. This is really effective for productions because it doesn’t require me to draw really big or really small and have a giant file to save with.

The first thing in which I was required to do for production was to create a new document using the ‘HDV/HDTV 1080’ format. This would allow me to have a screen size for the average ratio and resolution for devices, it would also have the screen zone and safe zone boarders around my project window. With this it would allow me to merge work with the same format settings and also not have to mess around with resizing once exported. I also learned about the other tools in the program and they were quite similar to the other Adobe packages, such as it had the pen tool and typeface tool with many others.

Another thing I learnt was that 72pts in text is equivalent to an inch in print. I can also import foreign font styles into illustrator and use them for my project also if the program itself doesn’t have the specified look which I am requiring. The text has full customization with line spacing and kerning, I can also change the paragraph line spacing also. I can change the text from a type and into a graphic, with this I can remove the group on the letters and start to drag them around and make something fancy with them. Along with these features I can also set anchor points for rotation on objects along with create shapes and transform them as I please. Another great thing which Illustrator can do is with font types I create I can pop and export them and place them into Maya and animate with them there, which is really good and it makes the text become 3D.

I also had a talk with my group and I have a few new tasks to be getting on with over the next few weeks. My tasks involve research, finalizing the script, plan how the script will be presented such as fonts and voice overs during the animated documentary. I also need to start the animatic for our project but I need to wait until all the storyboard designs are done before I can start that.

Finalizing The Noise Pollution On Marine Wildlife Script

Today I finalized my script for the Noise Pollution On Marine Wildlife animated documentary. I had used the draft I had created a while ago and went through it to pick out the crucial points of information and structure it in order to create a successful and effective script. I included an Overview, Why Marine Wildlife Need Sound, What Noise Pollution Does and How We Can Help. With these headings it covers the whole area and provides the audience with enough information to understand and know a lot about it and how to fix the issue. I have structured the script also to be presented in short paragraphs and sentences to allow a much easier read for us and to split up the different sections of information effectively. I have posted the final script and draft to the Trello page along with a description with what I have done. I am open to changing things if my group arent satisfied or fell as if I have included too much or missed something out. Along with this we have a meeting at 4:30pm with a man from America who is knowledgeable in this topic so hopefully he can give us a lot of more insight and useful and unique information to include in our aniamted documentary. The final script can be found below!


Overview – Part 1 

There is a reason to why the ocean is referred to as the ‘silent world’. In this world, where sounds are crucial to survival, there is no room or need for foreign sounds to breach the harmony of this unique world. 

Sensitivity of various marine animals to ocean noise pollution is varying. While cetaceans like whales and dolphins may show a greater resistance, soft shelled species like molluscs, prawns and fish are much more sensitive.  

Exposure to foreign noise during the embryonic stage increases sensitivity of fish to the noise impact, increasing the mortality rates at time of birth and development of genetic anomalies. 

The type of medium determines the speed of sound. On land sound travels at 350 metres per second. In the ocean, sound travels much faster around 5x the speed as on land and longer.  

This is the reason that marine creatures rely on hearing much more than other senses such as sight. Light for example can only travel a few hundred metres underwater before getting absorbed and scattered. Along with the sediments found in the ocean this can limit long range vision, like looking through fog on land. 


Why Marine Life Need Sound – Part 2 

Marine wildlife throughout the years have evolved a perfectly tuned sense of hearing. There have been species of blind fish and amphibians but never deaf which shows how important hearing is to survival if you live in the ocean. 

The sound is relied on to listen, find habitats, navigate, find mates and communicate with each other when hunting or to avoid being hunted.  


How It Effects Marine Life – Part 3 

But whilst nature’s sounds travel so does man-made noise, which can easily drown out the natural ocean soundscape, making it difficult for fish to hear one another. This affects their ability to find food and mates, causes stress and changes their behaviour.  

In busy shipping lanes, scientists have even come across physical damage in the largest of our planet’s mammals the whales.  

More scientists are discovering that noise not only interferes with an animal’s cognitive processing of sounds, but also other types of stimuli, such as sight or smell. For example, boat noise interferes with the visual signals that cuttlefish use to communicate with each other.  

Climate change, overfishing and run-off pollution threaten fish populations in the Great Barrier Reef, but our study adds to the growing evidence that boat noise may also contribute to fish death through a failure to learn.  

Boat noise can have a variety of negative impacts on fishes. It can change their activity, force them to live in bad habitats and decrease their ability to feed, defend their territory, reproduce and avoid predators.  


How to Help and Prevent – Part 4 

Wwant to draw attention toward this issue and know of ways to reduce and solve the problem. Such as agreeing and sticking to a set of principles to reduce noise impacts worldwide, along with making the noise less painful.  

In some places, such as biodiversity hotspots or sensitive habitats, it may be prudent to create rules or laws that minimize the impacts of noise. 

These laws could include silent zones and speed restrictions along with the use of lower powered engines and mufflers.   

Unlike other pollution that enters our water, noise pollution is the easiest to tackle. Once the noise stops, it’s gone. We’re not left with detritus that continues to pollute and kill marine life for decades to come, as with plastic, oil and sewage.  

In terms of manageability, we can do a much better job with solving this problem. And if we can solve this problem, that’s one less crisis to worry about our oceans. 

Humans rely on the ocean for its biodiversity and natural resources. It also plays a fundamental role in regulating atmospheric temperatures and gases.  

 Today’s seas continue to face these threats, as well as from habitat destruction, warming and ocean acidification. 

Learning The Basics Of Adobe After Effects

Today I attended a lecture which taught be how to use the basics of Adobe After Effects. I was taught how to load up an efficient starting composition and how to use the pen tool and pins to allow for a basic animation with the moving parts of a shape. This was created by me setting the pin points in the shape which I drew using vectors and then key-framing the different positions which they would move to. I also tried this with different images of google to allow for movement in a character form. This allowed for me to create basic background animations for projects which I am wanting to use them in. Another thing I learnt to do was how to duplicate and add effects to my shapes which would act continuously and in time with my key-frames. Along with this I was able to set a continuous effect to an object by editing the code. In order to do this I had to create an Advanced Pin then click Puppet then Mesh along with going to Deform then to Pin Position. After this I had to click the swirl press the drop down arrow then edit the code. I used the wiggle code and had to apply a distance in pixels followed by a comma to how many times per second.

I also got taught how to add effects onto different objects which I could do my locating the Object click Contents then to Add and Transform. These were also really effective for background animations because it doesn’t provide me to set the key-frames throughout the timeline I just had to change the coding and it would continue throughout on its own. The final thing which I completed was to use a robot rig downloaded from Blackboard. I had to attach his body parts them create some basic movements and effects with the tools I had learnt before. This was to bring everything which I had learnt together and have a completed mini background animation for a project. Having been given this information it has helped me understand the basics of After Effects a lot more and how opened up opportunities which I could use for our Animated Documentary that I didn’t know was possible before, it has been really helpful.

Organising Contact Meetings

Over this weekend I have been spending some time contacting the different people I reached out to in order to gain some more insight on the Noise Pollution on Marine Wildlife. I have been providing my contacts I have gained with progress updates towards our animated documentary. I have also been back and forth with someone from America who is going to give us a lot of insight into our topic by holding a conference call with us. I had to work out the best way to do this with him in order to allow him to share his screen with us and give the extra information which I am looking for. Eventually we found a way to do this by using an app called GoToMeeting. I was able to create a meeting for free with a short free trial with a new account which will be able to last until the meeting date tomorrow at 5pm. With this we are all able to join and can ask whatever questions which we have and also get presented with the information which this man is going to provide us with. This is going to be extremely efficient with our progreess through our animated documentary, because with this information it will allow me to finalize our script and also finish the fact checking so we can start our actual production with all the required pieces.

Mini Presentation On Work So Far

Today in the lecture we were required to prepare and present a mini presentation on our idea and work so far. I created a short PowerPoint containing key moments over the past few weeks of production, planning and research, individual tasks and a basic weekly timetable which we have followed so far. When presenting we were given a lot of useful feedback about the work we had produced. I explained the planning stages which we had gone through to reach our current position and choice of topic. We all talked about are responsibilities and what we had accomplished so far, and the weekly schedule for what we had produced so far. Afterwards Ffion spoke about her drawings and colourways for the different props and design of our product. Following this James spoke about his branding on his website which he had been focusing on and showed the different utilities it had for the audiences. The main feedback we got was to include more visuals and show what we were talking about. Overall though we were told that we had good ideas and a good choice of topic and it will go well with audiences feeling the same as we do about our chosen topic.

Continuing The Group Planning

Today me and my group went away and did some more planning. We went over all the work which we had individually completed throughout the week. I completed my basic script, James started branding, and Ffion and Vicky carried on with the initial story development. We decided to go through and update our pipeline and decided that James would carry on with branding, I would create an animatic from the storyboard when created and also get a more concise script together. Ffion would do backgrounding and Vicky would start character design and storyboarding.

With these roles we decided to think of what animation style to create the animated document in, we couldnt decide so we went on to choosing how the story would go. This went really well, with the story we had a lot of different ideas but they all stayed on the same sort of line. Our idea ended up to be of a shot under the water of a group of whales swimming together. It would then pan above showing a boat coming overhead. Going underwater again would show the whales communicating to each other with sound, the boat would come over and disrupt the whales communication. One would get lost from the school and become confused. This whale would then end up washed on a beach because it couldnt use its sound to how it was useful because of loud boats sending it off its course.

After coming up with this mini story for our animated documentary our lecturer showed us a very useful tool on the program Adobe After Effects. It was the pinning tool, this tool allowed us to select points in an image that we wanted to be animated such as a whale and have them be able to move around like it was swimming. After seeing this me and my group were amazed and decided that we were going to use that method of animating using Adobe After Effects.